


The iPhone 17 series is one of Apple’s boldest in recent memory. The base iPhone 17 has adopted once Pro-only features, such as the long-requested 120Hz ProMotion Display, while the iPhone Air pushes the boundaries of design and engineering, and the iPhone 17 Pro and Pro Max boast a swathe of truly professional new features, including ProRes RAW and GenLock.

They also arrive with the latest iOS 26 user experience, a visual departure from the flat interface of previous releases. Liquid Glass, plus a few notable additions, changes the look, feel and behaviour of iOS in new and interesting ways.
Whether you’re new to the iPhone 17 series or a long-time iPhone user upgrading to one of Apple’s best and brightest new entries, you’ll undoubtedly find some helpful tips and tricks in this guide. It’s written by someone who’s reviewed almost every model of the last decade, and spent a lot of time optimising the iOS experience as a result.
The majority of these tips should work across the iPhone 17, iPhone Air, iPhone 17 Pro and iPhone 17 Pro Max, as well as recent but older models. Read on for the full run-down.
Customise the lock screen clock
With iOS 16, Apple added the ability to customise the lock screen clock’s font and colour but, with iOS 26, it expanded on the degree of personalisation available.
Now, you also have the option to scale the clock which, paired with the Always On Display, makes for a useful one-two punch of functionality. You can also still customise font and colour, as well as choose whether it adopts the Liquid Glass aesthetic, or the more traditional flat appearance of previous generations of iOS.
Foundry | Alex Walker-Todd
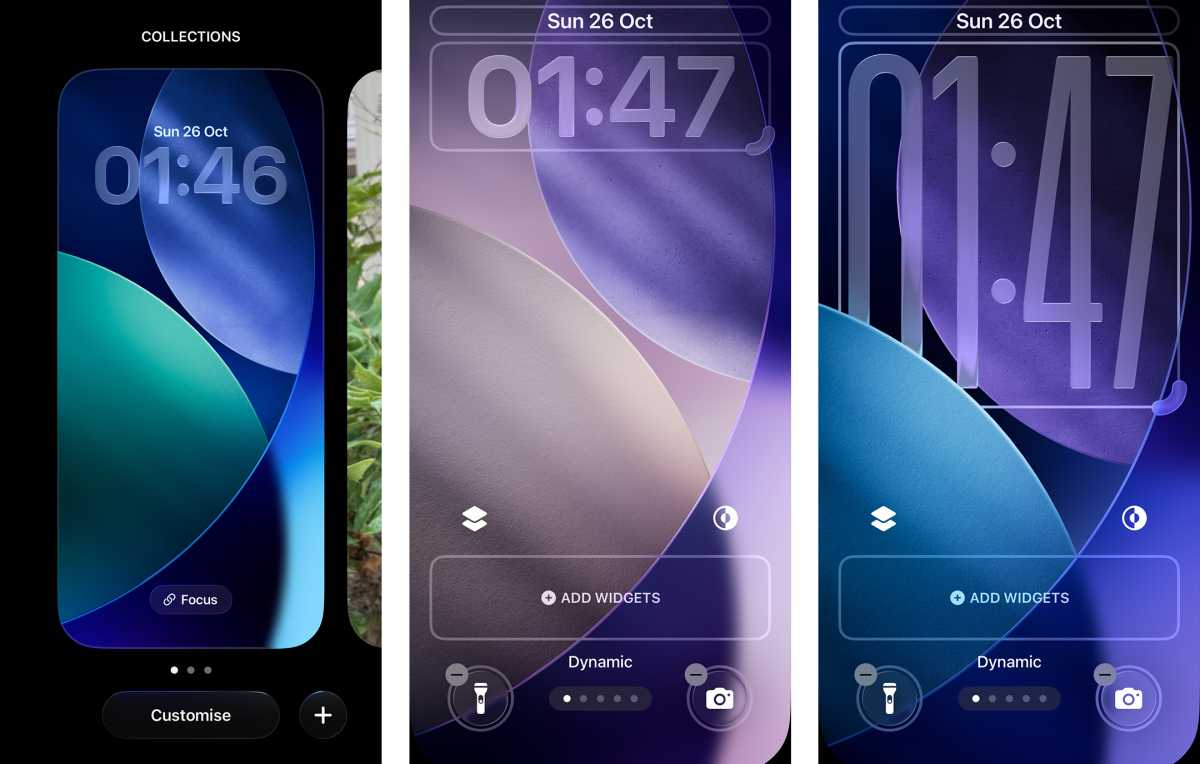
HOW? From your lock screen, press and hold on a blank area until the lock screen wallpaper zooms out. Next, tap the Customise button, which appears at the bottom of the screen. Bounding boxes will appear around all the key UI elements you can interact with, including the clock.
Tap and drag on the grab handle visible in the bottom right of the clock’s bounding box, and then simply drag downwards to extend the clock to your preferred height.
Once you’re happy with the position of the lock screen clock, tap anywhere within the clock’s bounding box to bring up the Font & Colour menu. As well as adjusting font and colour, there’s now a new Glass / Solid toggle, which you can experiment with too.
Spatial Scene lock screen
Sticking with lock screen tips, iOS 26 also introduces a faux 3D effect on certain images. Called Spatial Scenes, this effect can be applied to your lock screen.
Provided you’ve chosen a lock screen image that the phone deems compatible with the feature (usually one with a clear foreground subject), you should be able to create a Spatial Scene lock screen.

HOW? First, head to Settings and then look for and tap on Wallpaper. From here, tap + Add New Wallpaper, or simply swipe along until you see ‘New’ at the top, and then tap the + icon to create a new wallpaper pair.
From here, tap on the Photos app icon in the top left of the screen. Next, choose a photo you want to use as your lock screen. Your phone will then switch to a full-screen lock screen preview, with your chosen image front and centre.
Provided your phone deems the image you’ve chosen compatible with Spatial Scenes, you’ll see two icons towards the bottom right of your screen, just above whatever lock screen shortcut you have assigned in the bottom right corner (usually, it’s the Camera app).
The left of these two icons should resemble a hexagon with a strikethrough. To enable Spatial Scenes on your lock screen, tap this hexagonal icon. After a brief bit of processing, where your phone will generate your new Spatial Scene lock screen, tap Add in the top right of the screen.
As you’re creating a new lock screen from scratch, tap Set as Wallpaper Pair on the subsequent pop-up. You’ll then be taken back to the Wallpaper Settings screen, but you can swipe up to close Settings or simply lock your phone.
Next time you tap the screen or power button to wake your phone up, you’ll be able to tilt your phone in your hand and enjoy the cool parallax effect of your newly-created Spatial Scene lock screen.
Note: Spatial Scene wallpapers only appear on the lock screen. On your home screen, they’ll just present as static images. Also, every time you change your lock screen image, you will have to re-enable the Spatial Scene feature. Your lock screen will become static and dimmed if you have a Focus Mode – like Do Not Disturb or Sleep – active.
Spatial Scene in Photos
If you want to see what the Spatial Scene effect would be like on multiple photos in your gallery, without having to go through the rigamarole above each time, you can easily view any compatible images as Spatial Scenes, right in iOS’ native Photos app.
Alex Walker-Todd
HOW? Simply open Photos, tap on an image you want to view as a Spatial Scene, and if your iPhone decides it’s compatible, you should then see a small hexagonal icon with an arrow on its right, towards the top right of the screen.
Tap the hexagonal icon and, after a moment of processing, your chosen image should now be a Spatial Scene. You can view the 3D effect by simply tilting your phone in your hand.
Faster haptics for a better feel
When Apple switched from a regular conventional spinning vibration motor (officially called an ERM or Eccentric Rotating Mass) to its Taptic Engine (Apple’s branded take on a Linear Resonant Actuator or LRA) back in 2015, it completely transformed the feel of interacting with an iPhone.
The Taptic Engine is much better than a spinning motor at conveying different sensations via haptics, with greater precision, force and distinction.
Foundry | Alex Walker-Todd
Performance is already generally great on the iPhone 17 series, but if you want your phone to feel even snappier, this one tweak in the Settings menu will make your device feel even faster.
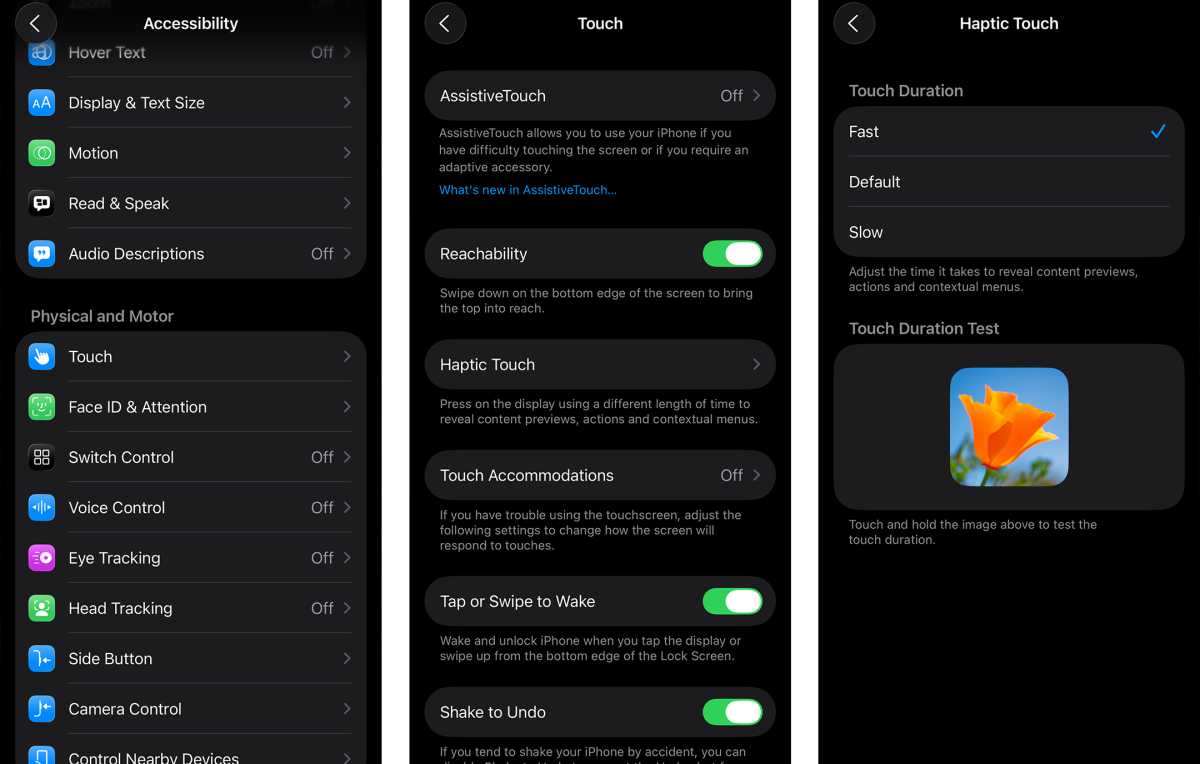
HOW? Head to Settings, scroll down and tap on Accessibility, and look for Touch. Within the Touch menu, the third option should be Haptic Touch. Select this and you’ll be presented with three duration options, with a test button beneath.
Out the box, your iPhone’s haptic touch duration will likely be set to Default, but try the other two options out, or simply switch it to Fast, with a tap.
Once you’re happy with the new feel of your iPhone’s haptics, back out of the Settings app with a swipe up from the bottom of the screen.
Hidden keyboard shortcuts
There’s more to the iOS keyboard than meets the eye. Despite the criticism the iOS keyboard has come under, it does also boast a host of powerful hidden features, which unless you know about, are easily missed.
As well as swipe-typing (where you don’t lift your finger from the screen between key presses to type a word), did you know you don’t have to toggle Shift or the numbers key to access capital letters and numbers? You can even move a cursor around to quickly scrub through text without ever having to touch a text box, and there are compact left and right-justified keyboards, all unseen, but right at your fingertips.
Foundry | Alex Walker-Todd
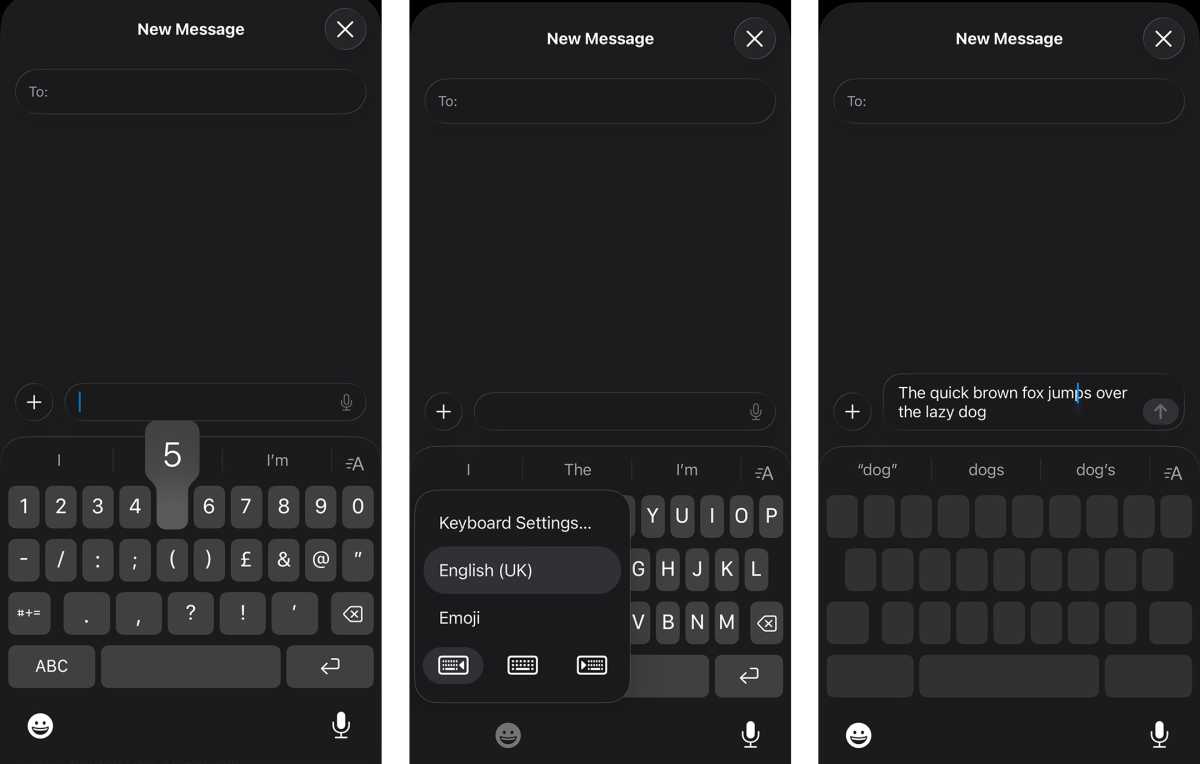
HOW? Access to most of these hidden features comes down to a tap-and-hold gesture.
In the case of capitalisation, rather than tapping the Shift key, and then tapping the letter you want capitalised, you can simply long-press on the shift key and – without taking your finger off the screen – drag over to the letter you want capitalised. Releasing your finger will then create a capital letter and switch the keyboard back to lower case in one fell swoop.
Similarly, rather than tapping the numbers key, selecting the number you want and then switching back to the letter view on your keyboard, you can just long-press on the numbers key, drag your finger over to the number you want, and release.
Long-pressing on the emoji key in the bottom right, beneath your keyboard brings up a menu which includes three keyboard layout option: the full-width keyboard you’re likely already using, or a left or right-justified compact keyboard, perfect for one-handed typing. Just drag your finger over and release on your preferred layout, or tap on the layout you want to use.
Lastly, rather than long-pressing on a text box and using the resultant magnifying glass to see where the cursor is as you scrub through text, long-press on the spacebar instead. You’ll see the letters of the keyboard disappear, while you remain in contact with the screen, effectively turning it into a trackpad, which you can then swipe around to more easily move the cursor in a given text entry field above.
Disable Control Centre on your lock screen
Control Centre is the de facto way to quickly toggle or access key features on your iPhone, but the convenience on offer is something of a double-edged sword, especially where theft is concerned.
While features like Find My iPhone are incredibly helpful and powerful, their real-time tracking hinges on your phone’s ability to maintain a cellular, Wi-Fi and/or Bluetooth connection. A savvy criminal who just swiped your device could quickly engage Airplane Mode without ever needing to unlock your phone or enter your passcode, essentially cutting off the breadcrumb trail Find My tries to leave.
Foundry | Alex Walker-Todd
The best defence – at the expense of only a little convenience – is to disable Control Centre access from your lock screen.
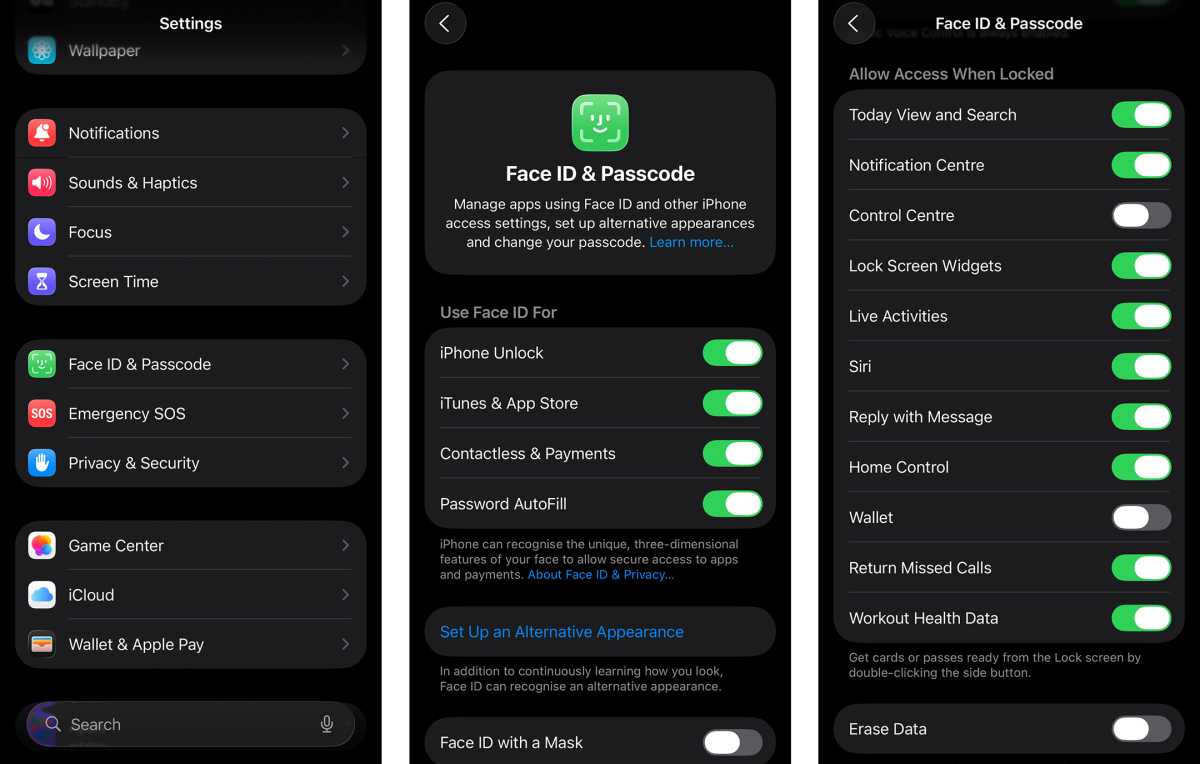
HOW? Head to the Settings app, then scroll down to and tap on Face ID & Passcode. Enter your device’s passcode on the next screen and you’ll then be presented with a run of different security settings.
Scroll down to the Allow Access When Locked section, and lastly tap the toggle next to Control Centre to disable access to the feature on your lock screen.
To test it, lock your phone, wake it back up and try swiping down from the top right corner of your lock screen. Control Centre should no longer appear.
Set a custom ringtone
Creating or setting your own ringtone used to be all the rage, but Apple made the process on iPhone a little too convoluted for most users, pushing them to buy ringtones through iTunes or simply rely on the pre-loaded default ringtones.
Thankfully, nowadays, it’s much easier to set your own custom ringtone, provided you have a compatible audio file (such as a .mp3 or .m4a) to hand.
Foundry | Alex Walker-Todd
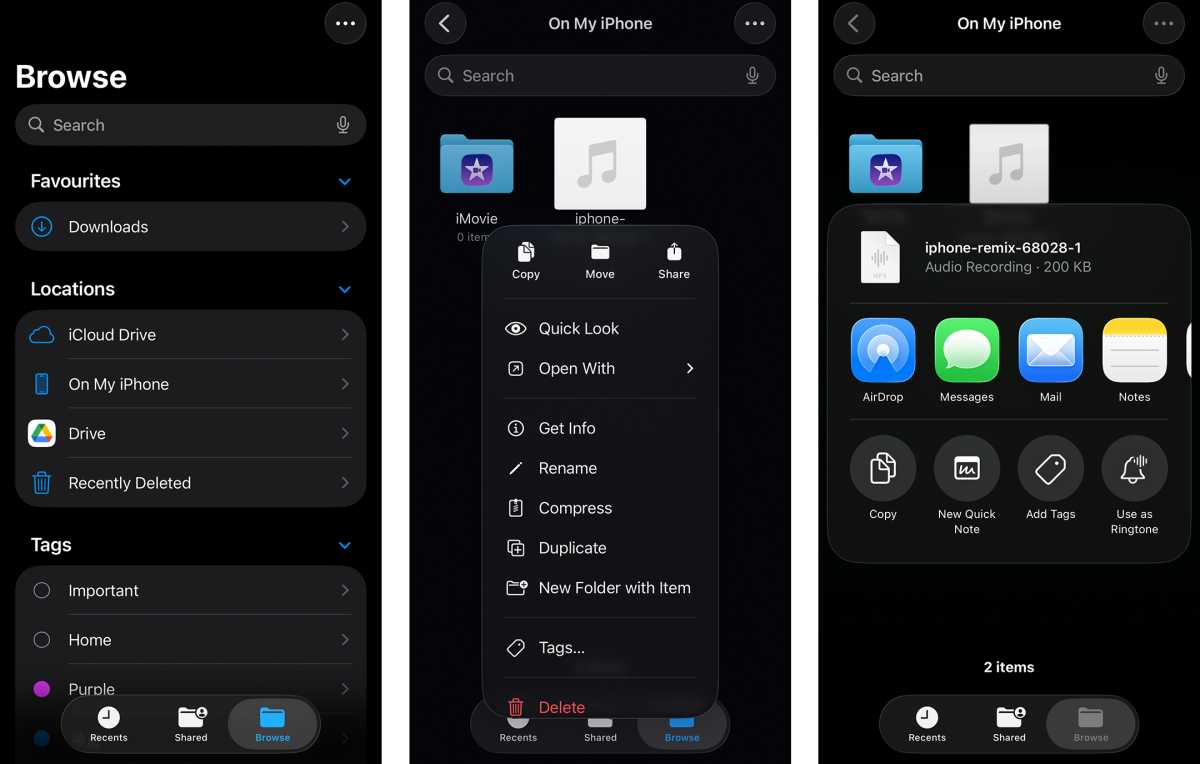
HOW? Once you’ve downloaded the audio file you want to use as your new ringtone to the Files app, open the app and find your downloaded audio.
Long-press on the file and on the subsequent pop-up menu, tap Share. Towards the bottom of the Share screen that follows, you’ll see the option to Use As Ringtone.
Note: Audio files must be shorter than 30 seconds to work as a ringtone.
Battery Percentage
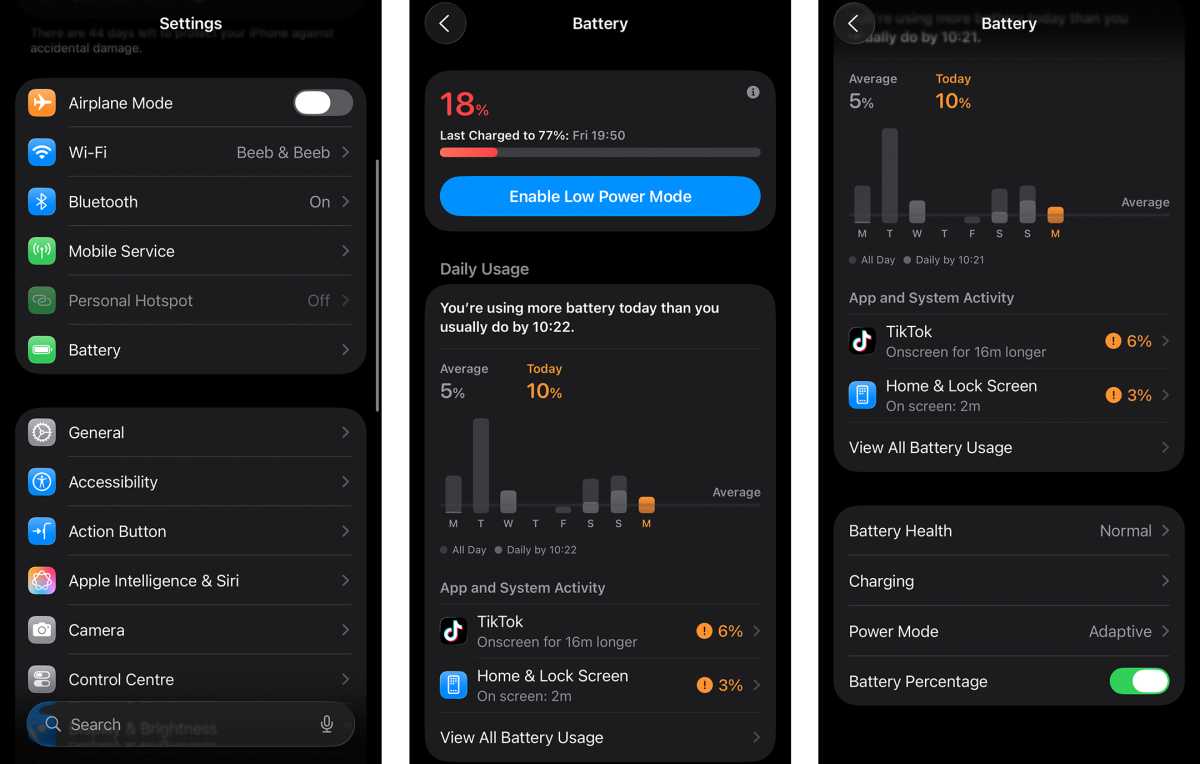
A small but handy tweak to the look of iOS comes with enabling Battery Percentage. While Apple would probably rather you don’t think about battery life too much and simply fork out for one of its latest chargers or MagSafe accessories, being able to keep tabs on your phone’s charge, or see how enabling/disabling different features affects longevity is handy.
Especially for those of you who’ve opted for the super-slimline new iPhone Air, battery life is arguably one of the most important aspects of the phone’s performance to be monitored.
Foundry | Alex Walker-Todd
Turning on Battery Percentage makes it much clearer where your battery life is at at a given moment. Once enabled, rather than a battery icon in the top right of the screen that simply reduces in size as you use your phone, the symbol will also contain a number, which relates to available charge remaining.
HOW? To see battery percentage, open Settings, scroll down and tap on Battery, and on the next screen, scroll down again and look for the Battery Percentage toggle. Flip it on and you’ll immediately see the battery icon in the top right update to include your device’s current charge level.
Set a Charge Limit
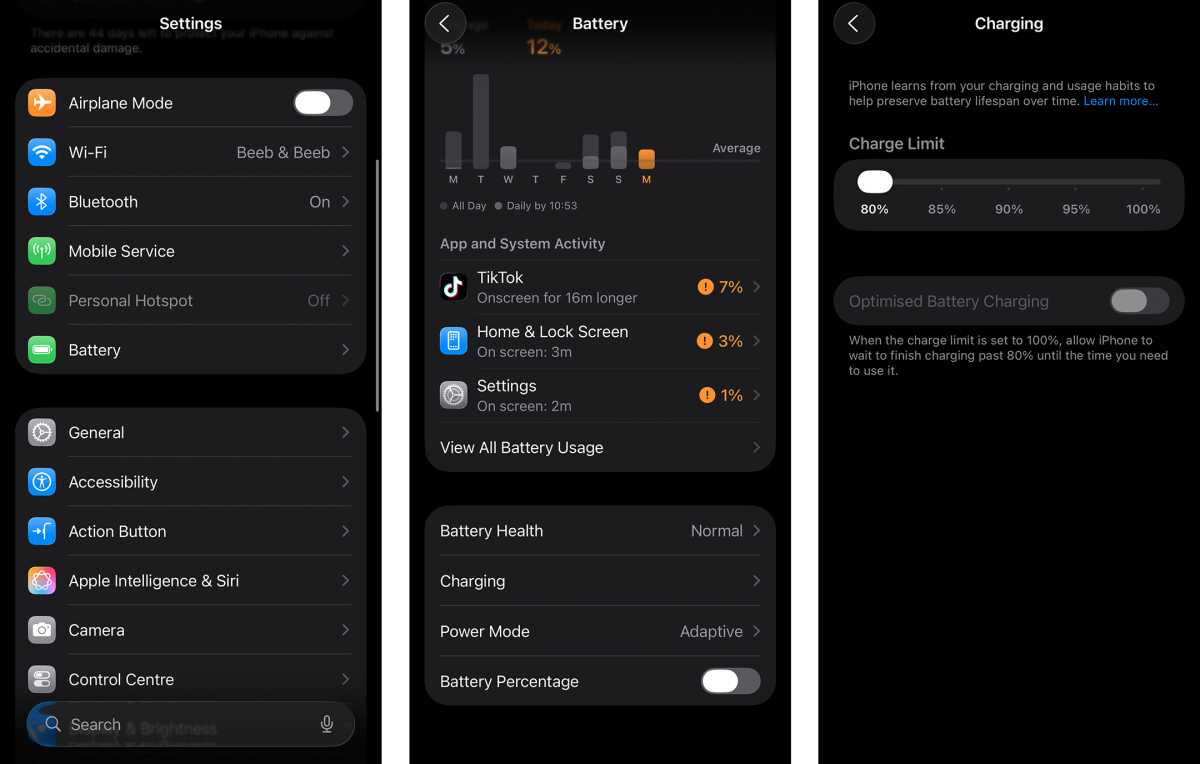
If you’re the kind of iPhone owner who keeps hold of their device for several years, you’re going to massively appreciate the Charge Limit feature.
The nature of current Li-ion smartphone batteries is that they operate best at between approximately 20% and 80% charge, and fully depleting to 0% or charging to 100% has actually been shown to reduce battery health over time, meaning the actual amount of charge your battery holds on to after multi charge cycles – even if it still claims to be 100% – is likely a lot less.
Foundry | Alex Walker-Todd
To combat this, phone makers such as Apple have started added charge limiting functionality to their software experience in order to extend long-term battery health.
HOW? Head to Settings, scroll down to and tap on Battery, and then look for Charging, towards the bottom of the Battery screen. Within the Charging sub-menu, you’ll see a Charge Limit slider, which in most cases will be set to 100% by default.
Drag the slider down as low as you’re comfortable with, knowing that the more strict the charge limit, the better your battery health will be over time (I’d recommend 80%).
Note: If you decide you don’t want to use a Charge Limit, at least make sure Optimised Battery Charging is enabled on the same Charging settings screen. When charging your phone overnight, this will limit charge to 80% for the majority of the night, until just before you wake up and start using your device, at which point the phone will continue to fill up to the full 100%.
Enable Adaptive Power Mode
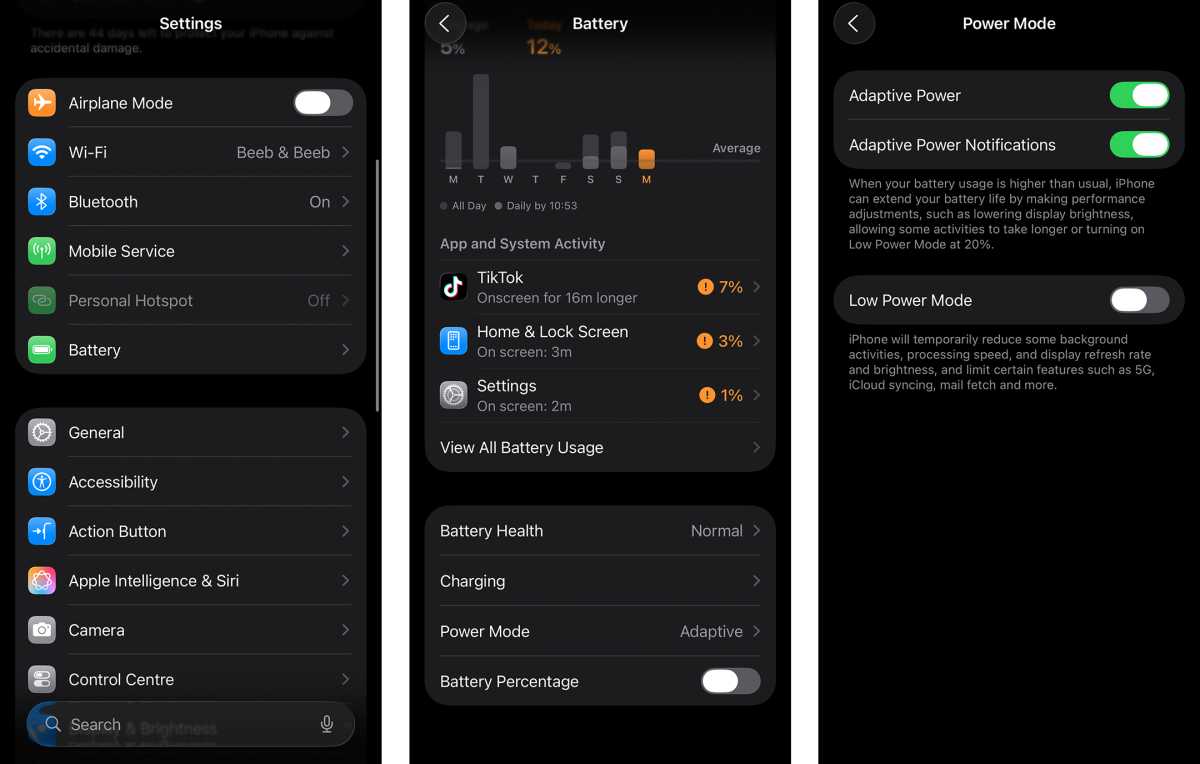
Chances are, you don’t need to run your iPhone at full brightness or with the chipset running at full tilt all of the time and, while iOS natively adjusts these aspects dynamically, there’s a more aggressive option when your iPhone detects higher power draw than usual.
Enabling Adaptive Power Mode automatically scales back things like brightness level, or will turn on Lower Power Mode in the pursuit of prolonging battery life.
Foundry | Alex Walker-Todd
How? To turn this feature on, head to the Settings menu and then, once again, tap on Battery. Scroll down the Battery sub-menu and the penultimate option should be Power Mode. Opening up the Power Mode menu, you’ll then be presented with a trio of toggles, the top one being Adaptive Power. Turn this on and your iPhone will more aggressively monitor its power demands against battery longevity.
Note: If you want more insight into what Adaptive Power is doing, you can also toggle on Adaptive Power Notifications for more information.
Turn on Vehicle Motion Cues
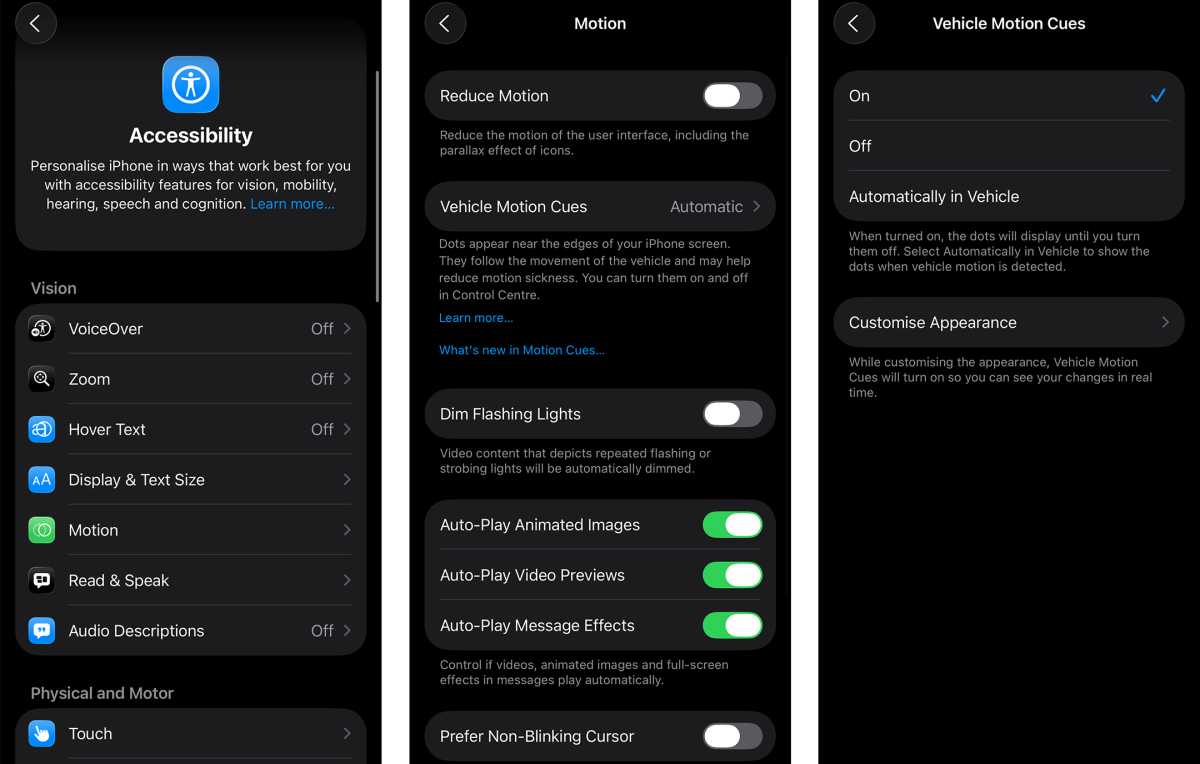
Whether you’re a passenger princess or the first to call “shotgun!”, if your phone use brings on motion sickness when riding in a car (or bus or boat), Motion Cues might be the solution.
This accessibility feature adds little dots around the edges of whatever it is you’re looking at on screen and, using motion data from your phone’s various sensors, moves those dots in opposition to any motion you may be experiencing while travelling. The dots give your brain a little something to latch on to, and help reduce the sense of nausea that can come from looking at a phone screen on the go.
Foundry | Alex Walker-Todd
HOW? Open the Settings app and scroll down to Accessibility, found just under the General option. Within Accessibility, you should see an option called Motion: tap on this. Tap Automatically in Vehicle for it only to initiate when your phone detects you’re in a moving vehicle, otherwise you can switch it On or Off as you see fit.
Note: Tapping Customise Appearance will let you customise the look of the motion cue dots, in terms of place, colour, number of dots and size of dots.
Make Apple Intelligence… more intelligent
Despite Apple’s ever-evolving Siri experience and, more recently, Apple Intelligence, the company’s efforts in the AI department have been… lacking, compared to much of the competition.
In fact, Apple’s had so much trouble building a competent AI experience of its own that it’s turned to one of the most prominent players in the space, OpenAI; baking its assistive ChatGPT experience into iOS and, more specifically, Apple Intelligence.
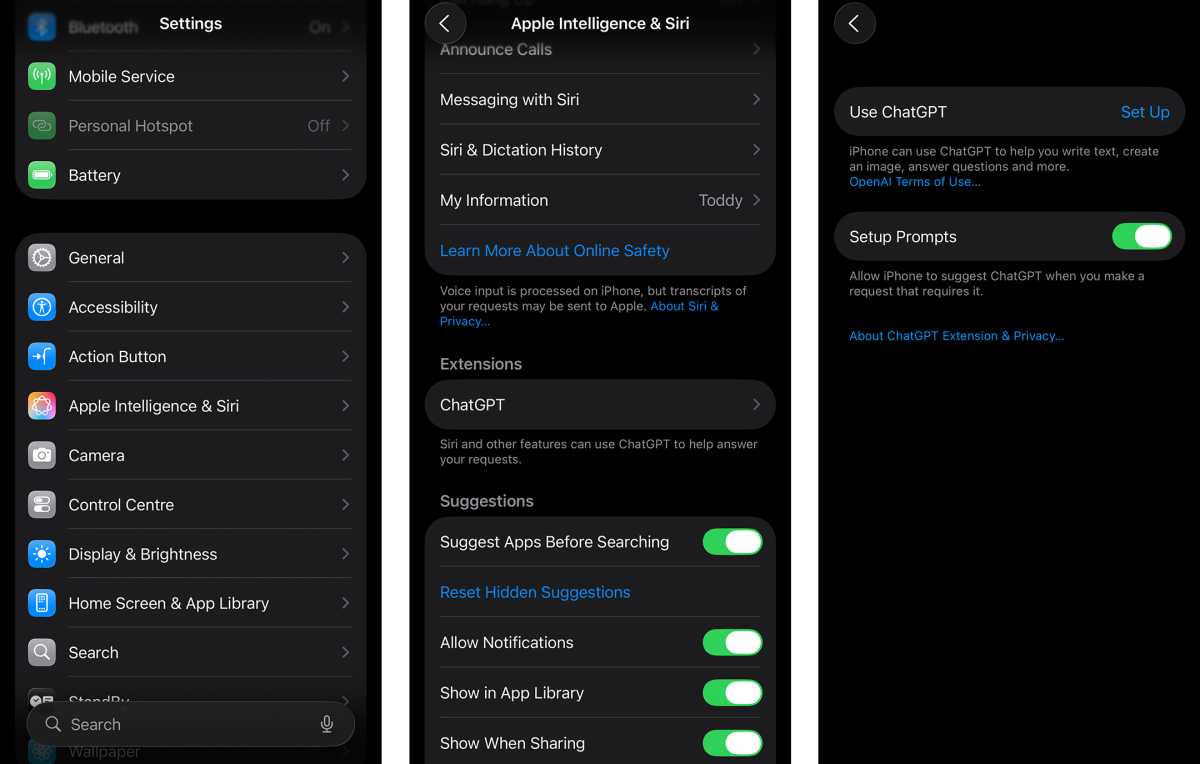

HOW? To add ChatGPT search and results into iOS, open Settings, scroll down and tap on Apple Intelligence & Siri. On the next screen, scroll down to a section called Extensions, and you should see ChatGPT as an option. Tap on ChatGPT, and you’ll move to another screen, with the words Set Up next to Use ChatGPT, which you need to tap to proceed.
Tap Next on the ChatGPT pop-up screen, followed by Enable ChatGPT towards the bottom of your screen, and you’ll then be good to go.
Note: You don’t need a ChatGPT account or the ChatGPT app installed on your iPhone in order to use this feature, but you can log in from the same ChatGPT sub-menu if you do have one.
4K 60fps video by default
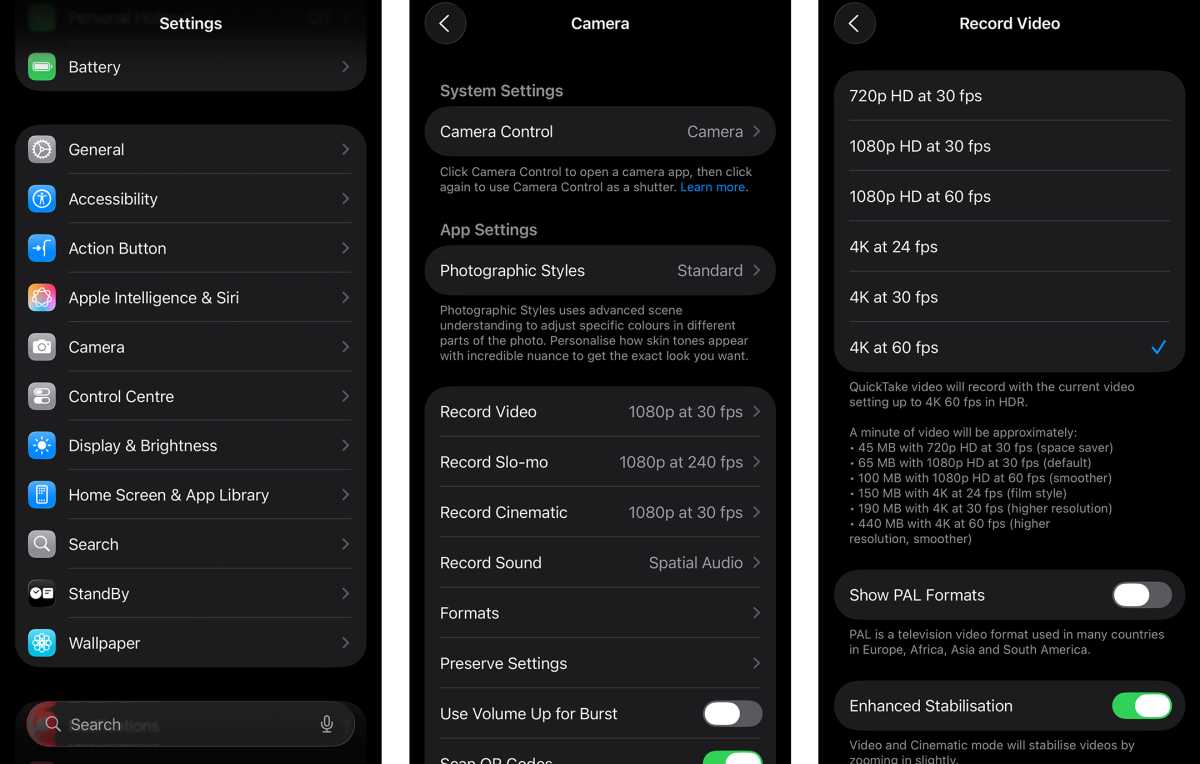
The iPhone 17 series all possess impressively competent cameras, but if you’re someone who shoots a lot of video, the out-of-box settings capture sub-par footage, with the 1080p 30fps being the default resolution and frame rate.
Dive into your phone’s Camera settings, however, and you can increase the capture resolution to 4K (that’s four times the default), as well as upping the frame rate (up to 120fps, depending on your model of iPhone).
Foundry | Alex Walker-Todd
HOW? Head into your phone’s Settings app, open up the Camera sub-menu, tap on Record Video and select 4K at 60fps, as a sure-fire way to ensure you get this resolution and frame rate every time you switch to video mode in the native Camera app.
Alternatively, open the Camera app, tap Video at the bottom of the screen (when holding your phone in portrait) to switch to video recording mode, and then tap the resolution and frame rate button in the top left of the viewfinder. You’ll see the button expand to show assorted resolutions and frame rates, which you can select independently, just by tapping on the configuration you want.
Add a grid and level to your camera
If you’re serious about snapping pictures or shooting video with your iPhone, there are a couple of handy tools to help with framing, which I enable on every iPhone I use.
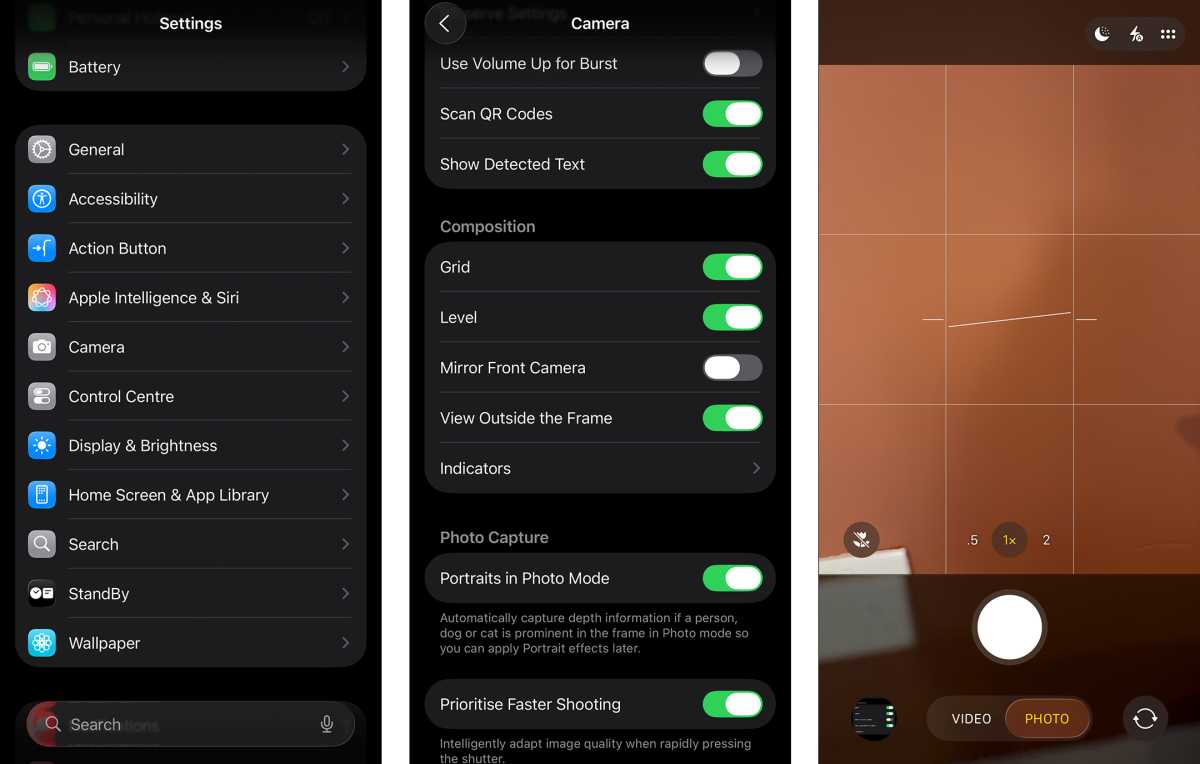
Grid adds a 3×3 grid across the viewfinder to help you better frame up your subject, allowing you to apply established photographic principles, like the rule of thirds (whether you realise it or not).
Foundry | Alex Walker-Todd
Level, meanwhile, acts like a spirit level, using the phone’s internal sensors to establish whether your phone’s camera is perpendicular to the ground and straight, helping mitigate perspective distortion of your subject (if that’s something you’re trying to avoid).
If you’re pointing your camera directly down at the ground, the level switches to a crosshair, which gives you insight into the pitch and roll of your phone; allowing you to make sure it’s perfectly parallel to the ground, or angled offset as much as you need.
HOW? Open the Settings app and tap on the Camera sub-menu. From here, scroll down to the Composition section, where you should find Grid and Level at the top of the list, with toggles beside each one that you can tap to enable.
Next time you open your camera, you should then see both the grid and level working as promised.
Disable Macro Control
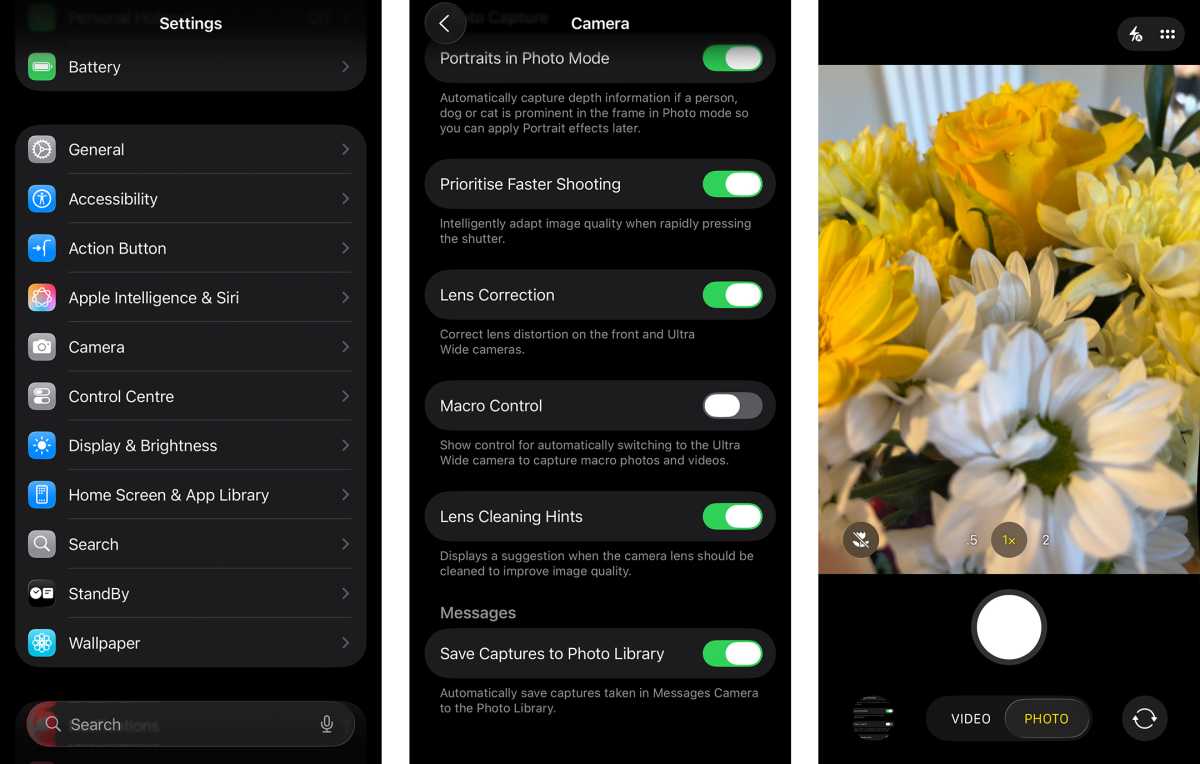
One of the minor annoyances I have with the native iPhone camera experience has to do with macro photography. By default, when you bring your iPhone’s camera close to a subject (only a few centimetres away), it’ll automatically switch to Macro Mode, which involves moving from the phone’s main, to its ultrawide lens.
While this switch means you can get much closer to your subject, the weaker abilities of the smaller ultrawide sensor compared to the main camera become evident. Shots generally suffer from weaker dynamic range, more processing and a lesser depth of field.
Foundry | Alex Walker-Todd
When the phone switches to Macro Mode, you do have the option to toggle back to your phone’s main sensor by tapping the flower icon which appears on screen, but this is a temporary fix.
If, like me, you’re happy to take macro shots with the main lens from a little further away in the pursuit of a better overall image, change this one feature.
HOW? Open the Settings app, then scroll down and tap on Camera. Scroll all the way down to the bottom of the Camera sub-menu and a few toggles up from the bottom you should see an option titled Macro Control. Tap on it to disable the auto-switch.
Note: Disabling Macro Control means you have to repeat this process and tap the toggle once more to re-enable any form of macro capture, which is a little frustrating and long-winded, but feels like the lesser of two evils.